Prakash

Telerik RadList Box Checkbox Items check all or uncheck all

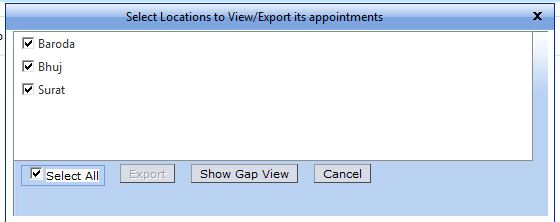
Aspx page: I bound the lstLocations dynamically. So it look like as below.

Capture

<telerik:RadListBox ID=”lstLocations” runat=”server” CheckBoxes=”true” Width=”520px”
Height=”130px”>
</telerik:RadListBox>

// Select All checkbox buttons
<asp:CheckBox CssClass=”CBFull” ID=”chkSelectAll” runat=”server” Text=”Select All”
onclick=”javascript:return ToggleAllLocations(this);” />
// Add below function in javascript function


function ToggleAllLocations(checkBox) {
             //ctl00_ContentPlaceHolder1_RadDockLocFilter_C_lstLocations is a client id of radlistbox                   
            var listbox = $find("ctl00_ContentPlaceHolder1_RadDockLocFilter_C_lstLocations");

            var j = listbox.get_checkedItems().length;

            if (!document.getElementById(checkBox.id).checked) {
                for (var i = 0; i < j; i++) {
                    listbox.get_checkedItems()[0].uncheck();
                }
            }
            else {
                for (var i = 0; i < listbox.get_items().get_count(); i++) {
                    var item = listbox.getItem(i);
                    listbox.trackChanges();

                    item.set_checked(true);

                    listbox.commitChanges();

                }                                           
            }
            return true;
        }


Google cloud Messaging (GCM) for Android App and Asp.Net server app

At the Google IO 2012, the beta version of Android push notifications system called C2DM was replaced by Google Cloud Messaging (GCM). GCM has many new features over the existing system. Refer to this document for details of the differences and details about migrating your existing systems from C2DM to GCM.

To get started, download the Extras > Google Cloud Messaging for Android Library from the Android SDK.This library provides the jars to simplify the development on both the server side and client side.

From the Google API console page, create a new project and generate the API key. Refer this page for complete details.

Google provides the sample apps in the SDK by default, you may download a very basic version of them containing only the code discussed in this tutorial from here.
The same application is also available on play store here.

For .Net App download click here

How to schedule and automate backups of SQL Server databases in SQL Server Express

Create store procedure.

// Copyright © Microsoft Corporation.  All Rights Reserved.
// This code released under the terms of the
// Microsoft Public License (MS-PL, http://opensource.org/licenses/ms-pl.html.)
USE [master] 
GO 
/****** Object:  StoredProcedure [dbo].[sp_BackupDatabases] ******/ 
SET ANSI_NULLS ON 
GO 
SET QUOTED_IDENTIFIER ON 
GO 
 
-- ============================================= 
-- Author: Microsoft 
-- Create date: 2010-02-06
-- Description: Backup Databases for SQLExpress
-- Parameter1: databaseName 
-- Parameter2: backupType F=full, D=differential, L=log
-- Parameter3: backup file location
-- =============================================
 
CREATE PROCEDURE [dbo].[sp_BackupDatabases]  
            @databaseName sysname = null,
            @backupType CHAR(1),
            @backupLocation nvarchar(200) 
AS 
 
       SET NOCOUNT ON; 
           
            DECLARE @DBs TABLE
            (
                  ID int IDENTITY PRIMARY KEY,
                  DBNAME nvarchar(500)
            )
           
             -- Pick out only databases which are online in case ALL databases are chosen to be backed up
             -- If specific database is chosen to be backed up only pick that out from @DBs
            INSERT INTO @DBs (DBNAME)
            SELECT Name FROM master.sys.databases
            where state=0
            AND name=@DatabaseName
            OR @DatabaseName IS NULL
            ORDER BY Name
           
            -- Filter out databases which do not need to backed up
            IF @backupType='F'
                  BEGIN
                  DELETE @DBs where DBNAME IN ('tempdb','Northwind','pubs','AdventureWorks')
                  END
            ELSE IF @backupType='D'
                  BEGIN
                  DELETE @DBs where DBNAME IN ('tempdb','Northwind','pubs','master','AdventureWorks')
                  END
            ELSE IF @backupType='L'
                  BEGIN
                  DELETE @DBs where DBNAME IN ('tempdb','Northwind','pubs','master','AdventureWorks')
                  END
            ELSE
                  BEGIN
                  RETURN
                  END
           
            -- Declare variables
            DECLARE @BackupName varchar(100)
            DECLARE @BackupFile varchar(100)
            DECLARE @DBNAME varchar(300)
            DECLARE @sqlCommand NVARCHAR(1000) 
        DECLARE @dateTime NVARCHAR(20)
            DECLARE @Loop int                  
                       
            -- Loop through the databases one by one
            SELECT @Loop = min(ID) FROM @DBs
 
      WHILE @Loop IS NOT NULL
      BEGIN
 
-- Database Names have to be in [dbname] format since some have - or _ in their name
      SET @DBNAME = '['+(SELECT DBNAME FROM @DBs WHERE ID = @Loop)+']'
 
-- Set the current date and time n yyyyhhmmss format
      SET @dateTime = REPLACE(CONVERT(VARCHAR, GETDATE(),101),'/','') + '_' +  REPLACE(CONVERT(VARCHAR, GETDATE(),108),':','')  
 
-- Create backup filename in path\filename.extension format for full,diff and log backups
      IF @backupType = 'F'
            SET @BackupFile = @backupLocation+REPLACE(REPLACE(@DBNAME, '[',''),']','')+ '_FULL_'+ @dateTime+ '.BAK'
      ELSE IF @backupType = 'D'
            SET @BackupFile = @backupLocation+REPLACE(REPLACE(@DBNAME, '[',''),']','')+ '_DIFF_'+ @dateTime+ '.BAK'
      ELSE IF @backupType = 'L'
            SET @BackupFile = @backupLocation+REPLACE(REPLACE(@DBNAME, '[',''),']','')+ '_LOG_'+ @dateTime+ '.TRN'
 
-- Provide the backup a name for storing in the media
      IF @backupType = 'F'
            SET @BackupName = REPLACE(REPLACE(@DBNAME,'[',''),']','') +' full backup for '+ @dateTime
      IF @backupType = 'D'
            SET @BackupName = REPLACE(REPLACE(@DBNAME,'[',''),']','') +' differential backup for '+ @dateTime
      IF @backupType = 'L'
            SET @BackupName = REPLACE(REPLACE(@DBNAME,'[',''),']','') +' log backup for '+ @dateTime
 
-- Generate the dynamic SQL command to be executed
 
       IF @backupType = 'F' 
                  BEGIN
               SET @sqlCommand = 'BACKUP DATABASE ' +@DBNAME+  ' TO DISK = '''+@BackupFile+ ''' WITH INIT, NAME= ''' +@BackupName+''', NOSKIP, NOFORMAT'
                  END
       IF @backupType = 'D'
                  BEGIN
               SET @sqlCommand = 'BACKUP DATABASE ' +@DBNAME+  ' TO DISK = '''+@BackupFile+ ''' WITH DIFFERENTIAL, INIT, NAME= ''' +@BackupName+''', NOSKIP, NOFORMAT'        
                  END
       IF @backupType = 'L' 
                  BEGIN
               SET @sqlCommand = 'BACKUP LOG ' +@DBNAME+  ' TO DISK = '''+@BackupFile+ ''' WITH INIT, NAME= ''' +@BackupName+''', NOSKIP, NOFORMAT'        
                  END
 
-- Execute the generated SQL command
       EXEC(@sqlCommand)
 
-- Goto the next database
SELECT @Loop = min(ID) FROM @DBs where ID>@Loop
 
END

How to execute store proc and create batch file for windows task scheduler or create a job in SQL server Agent.

Example1: Full backups of all databases in the local named instance of SQLEXPRESS by using Windows Authentication

// Sqlbackup.bat

sqlcmd -S .\EXPRESS –E -Q “EXEC sp_BackupDatabases @backupLocation=’D:\SQLBackups\’, @backupType=’F'”

Example2: Differential backups of all databases in the local named instance of SQLEXPRESS by using a SQLLogin and its password

// Sqlbackup.bat

sqlcmd -U SQLLogin -P password -S .\SQLEXPRESS -Q “EXEC sp_BackupDatabases @backupLocation =’D:\SQLBackups’, @BackupType=’D’”

Note: The SQLLogin shouldhave at least the Backup Operator role in SQL Server.

Example 3: Log backups of all databases in local named instance of SQLEXPRESS by using Windows Authentication

// Sqlbackup.bat

sqlcmd -S .\SQLEXPRESS -E -Q “EXEC sp_BackupDatabases @backupLocation=’D:\SQLBackups\’,@backupType=’L'”

Example 4: Full backups of the database USERDB in the local named instance of SQLEXPRESS by using Windows Authentication

// Sqlbackup.bat

sqlcmd -S .\SQLEXPRESS -E -Q “EXEC sp_BackupDatabases @backupLocation=’D:\SQLBackups\’, @databaseName=’USERDB’, @backupType=’F'”

Similarly, you can make a differential backup of USERDB by pasting in ‘D’ for the @backupType parameter and a log backup of USERDB by pasting in ‘L’ for the @backupType parameter.

@@@ 🙂

The command “xcopy /Q /Y exited with code 4 error on build project .net

When you build the project visuals studio gives the error as below.

Error 2 The command “xcopy /Q /Y E:\My Projects\test\*.*
E:\My Projects\bin\” exited with code 4.

Go to project Properties > Build Events

In Post-build event section you may find something like this: xcopy “$(ProjectDir)Library\dsoframer.ocx” “$(TargetDir)” /Y /E /D1

Remove this line. Save All. Build the Project again.

Error resolved. 🙂

How to read RSS feed using Jquery

Click here download latest plugin

Getting Started
First include the jQuery and zRSSFeed libraries.

<script src="http://ajax.googleapis.com/ajax/libs/jquery/1.7.1/jquery.min.js" type="text/javascript"></script>
<script src="jquery.zrssfeed.min.js" type="text/javascript"></script>

Add a DIV tag where you wish the feed to display and give it an ID. There is no need to specify a class, this will be added.

<div id="test"></div>

Now add the script to call the zRSSFeed plugin with the RSS URL and any options. Our example gets 5 feeds from the Reuters site.

<script type="text/javascript">
$(document).ready(function () {
  $('#test').rssfeed('http://feeds.reuters.com/reuters/oddlyEnoughNews', {
    limit: 5
  });
});
</script>

More option you can get by click here

LinkedIn authentication integration

For LinkedIn Authentication I have utilized LinkedIn Rest API which use oAuth 1.0 to authorize users and begin making REST API calls using any programming language. Complete understanding tutorials are placed at https://developer.linkedin.com/documents/oauth-overview

Following are the steps to implement LinkedIn Authentication in ASP.Net

Step 1 Installations

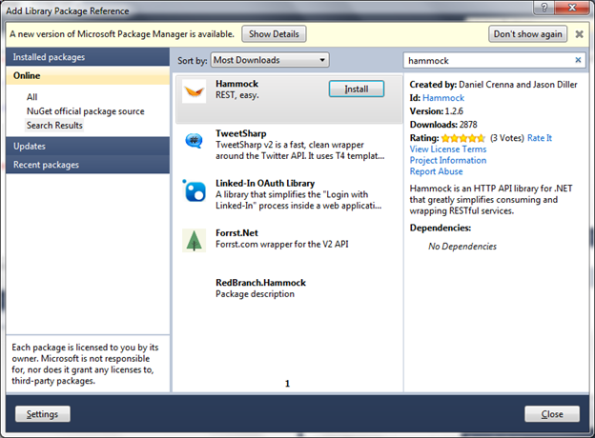
Install Hammock Library from CodePlex.com, Hammock is a REST library for .Net that greatly simplifies consuming Restful services.
Configure NuGet (optional to ease referencing code plex libraries directly in Visual Studio project). You can also get the NuGet from http://nuget.codeplex.com/

Step 2 Create LinkedIn Application in LinkedIn developer platform

Go to https://www.linkedin.com/secure/developer
Sign in with your LinkedIn credentials.
Click on Add New Application and fill in the form.
Once your application is created note the API Key and Secret Key that we will use to implement LinkedIn authentication in our application.

Step 3 Create ASP.Net Application

Open Visual Studio and create a new Web Application project.
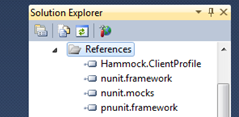
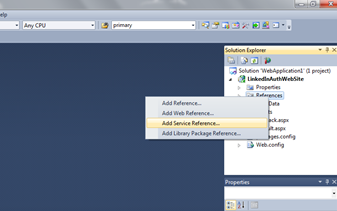
Add references to Hammock library either by manually referencing from folder or just referencing through NuGet in Visual Studio Directly as shown below.
public
void RequestTokenAndAuthorize()

{

var credentials = new Hammock.Authentication.OAuth.OAuthCredentials

{

CallbackUrl = “http://localhost/LinkedInAuthWebSite/Callback.aspx”,

ConsumerKey = “API Key”,

ConsumerSecret = “Secret Key”,

Type = Hammock.Authentication.OAuth.OAuthType.RequestToken

};

var client = new Hammock.RestClient

{

Authority = “https://api.linkedin.com/uas/oauth”, Credentials = credentials };

var request = new Hammock.RestRequest { Path = “requestToken” };

Hammock.RestResponse response = client.Request(request);

String[] strResponseAttributes = response.Content.Split(‘&’);

string token = strResponseAttributes[0].Substring(strResponseAttributes[0].LastIndexOf(‘=’) + 1);

string authToken = strResponseAttributes[1].Substring(strResponseAttributes[1].LastIndexOf(‘=’) + 1);

Session[“Token”] = token;

Session[“TokenSecret”] = authToken;

Response.Redirect(“https://www.linkedin.com/uas/oauth/authorize?oauth_token=” + token);

}

CallBack URL will be called when the authorization is successfully done by LinkedIn.

Now Create a CallBack page where the callback takes place when the authorization is done after successful login. In my case I have created a Callback.aspx.
In the Callback page place following code in the Page_Load method.

protected
void Page_Load(object sender, EventArgs e)

{

String verifier = Request.QueryString[“oauth_verifier”].ToString();

Session[“Verifier”] = verifier;

var credentials = new Hammock.Authentication.OAuth.OAuthCredentials

{

ConsumerKey = “API Key”,

ConsumerSecret = “Secret Key”,

Token = Session[“Token”].ToString(),

TokenSecret = Session[“TokenSecret”].ToString(),

Verifier = verifier,

Type = Hammock.Authentication.OAuth.OAuthType.AccessToken,

ParameterHandling = Hammock.Authentication.OAuth.OAuthParameterHandling.HttpAuthorizationHeader,

SignatureMethod = Hammock.Authentication.OAuth.OAuthSignatureMethod.HmacSha1,

Version = “1.0″

};

var client = new
RestClient { Authority = “https://api.linkedin.com/uas/oauth”, Credentials = credentials, Method = WebMethod.Post };

var request = new
RestRequest { Path = “accessToken” };

RestResponse response = client.Request(request);

String[] strResponseAttributes = response.Content.Split(‘&’);

string token = strResponseAttributes[0].Substring(strResponseAttributes[0].LastIndexOf(‘=’) + 1);

string authToken = strResponseAttributes[1].Substring(strResponseAttributes[1].LastIndexOf(‘=’) + 1);

Session[“AccessToken”] = token;

Session[“AccessSecretToken”] = authToken;

GetUserProfile();

}

GetUserProfile method is used to get the Logged in User First Name and Last name to display on Callback page.

public
void GetUserProfile()

{

var request = new
RestRequest

{

Path = “~”

};

var credentials = new Hammock.Authentication.OAuth.OAuthCredentials

{

Type = Hammock.Authentication.OAuth.OAuthType.AccessToken,

SignatureMethod = Hammock.Authentication.OAuth.OAuthSignatureMethod.HmacSha1,

ParameterHandling = Hammock.Authentication.OAuth.OAuthParameterHandling.HttpAuthorizationHeader,

ConsumerKey = “API Key”,

ConsumerSecret = “Secret Key”,

Token = Session[“AccessToken”].ToString(),

TokenSecret = Session[“AccessSecretToken”].ToString(),

Verifier = Session[“Verifier”].ToString()

};

var client = new
RestClient()

{

Authority = “http://api.linkedin.com/v1/people”, Credentials = credentials, Method = WebMethod.Get

};

var MyInfo = client.Request(request);

String content = MyInfo.Content.ToString();

var person = from c in
XElement.Parse(content).Elements()

select c;

String fullName=String.Empty;

foreach (var element in person)

{

if((element.Name == “first-name”) || (element.Name==“last-name”))

fullName += element.Value.ToString();

}

lblName.Text = fullName;

}

Step 4 Run the Application

Download source code: here
How to send the build to already provisioned remote person’s iPhone

If you’ve been through the distribution process of an Ad Hoc application, you can appreciate the challenges of getting a build installed on someone’s device. From the differences of working with users on Windows versus Mac machines, to explaining how to import an Ad Hoc provisioning file and the associated build into iTunes, this process is anything but a walk in the park.
In this post I’ll take you through the steps of deploying Ad Hoc builds over-the-air, where users simply point the Safari web-browser (on their iPhone) to a link and tap to install the provisioning file and associated application.
Provisioning Profile
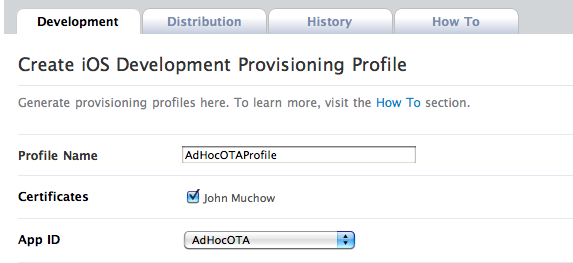
To begin, create a provisioning profile like you would for any other Ad Hoc build. In the image below you’ll notice I created a profile named AdHocOTAProfile and associated this with the app id AdHocOTA.

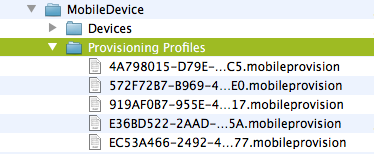
Once the profile is created, download onto your location machine and drag/drop the file onto the Xcode icon, this will install the provisioning file into the following folder: ~/Library/MobileDevice/Provisioning Profiles. The image below is a screenshot of the profile path on my machine – notice the provisioning file name is no longer the nice readable name that was written to your file system when you downloaded the file, this is to be expected.


From within Xcode, you can now associate this provisioning profile with your build. In the Target settings, select the Build tab, in the Code Signing section choose the new Provisioning Profile you created:

Xcode Build and Archive
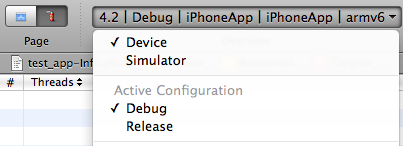
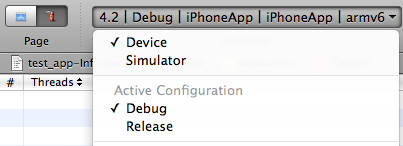
Once you have a working project within Xcode (with the Code Signing identity set as mentioned above), make sure that you set the build type to Device.


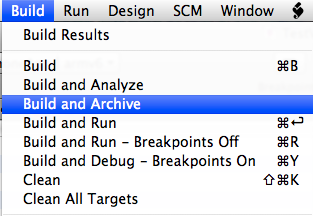
From the Build menu in Xcode, choose Build and Archive (if this option is not highlighted, make sure you’ve selected Device in the build settings.

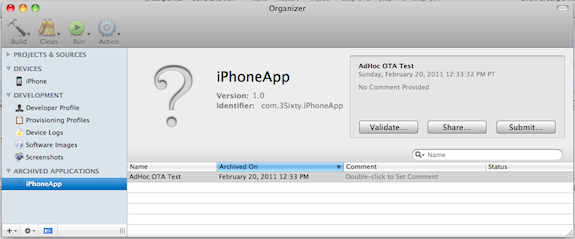
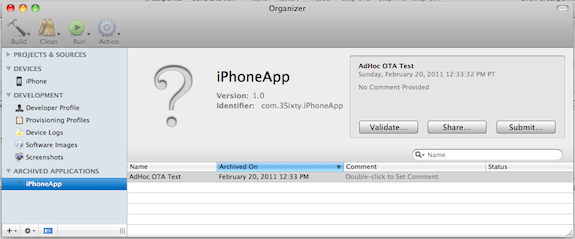
Once the build is complete, the Organizer window will appear – make sure the Archived Applications section is selected on the left panel.


In the figure above, I’ve updated the Name of the app to AdHoc OTA Test, this is optional, as well as any comments you would like to include.
Click on the Share button, and a new dialog will appear similar to that shown below:

From the Identity dropdown, select the Provisioning Profile created earlier:

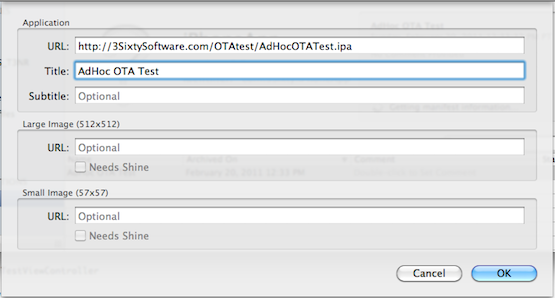
Now choose Distribute for Enterprise – fill in the URL to the location where you plan to host the application. Note that you must include the fullpath to the application, including the name of the .ipa file that you plan to use:

At this point, don’t worry about the image files, I believe those are applicable only if you are doing an OTA deployment through an Enterprise developer account (internal app distribution for corporations). Update: Seems there may be a little more to how the images are used beyond Enterprise deployments, see the comments section for more information.
Once you select Ok, you will be prompted for a filename to save the build, verify that you use the same name as you specified in the URL:

At this point ipa and plist files will be created for you, the provisioning file will be embedded within the ipa.
OTA HTML File
With the build complete, we know need to create a very simple webpage that will allow users to find the application on a web-server.
The html below is as about as bare-bones as we can get, it’s nothing more than a link to the file, with a specific href for itms-services which Safari will recognize and initiate the download/install process when clicked.


<HTML>
<title>OTA Test App </title>
<body>
< a href=”//?action=download-manifest&url=http://3SixtySoftware.com/OTAtest/AdHocOTATest.plist” > Tap Here to Install the Application </a>
</body>
</HTML>

Important: – Replace the path shown above with the path to where you will upload the ipa and plist files that Xcode created.
Save the html file with the extension .html
Upload To Web-Server
We’re getting close – at this point we are ready to upload the ipa, plist and html files. The figure below shows the directory listing on the web-server where I uploaded the files:

Install the iPhone Application OTA
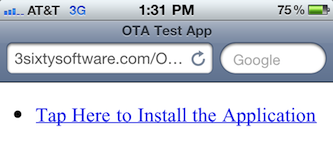
To download the application via OTA, start your web-browser and point it to the link where the html file lives. Once loaded you should see a screen similar to the figure below:

Tap on the link and a dialog will appear asking if you would like to install the Ad Hoc application:

If all works as expected, at this point you can send a link to the html file to anyone you included in the provisioning file and they can install the application OTA.

You download sample “Hello” project html, plist and ipa file: here

Reference link: Link 1, Link 2, Link 3