iPhone

How to send the build to already provisioned remote person’s iPhone

If you’ve been through the distribution process of an Ad Hoc application, you can appreciate the challenges of getting a build installed on someone’s device. From the differences of working with users on Windows versus Mac machines, to explaining how to import an Ad Hoc provisioning file and the associated build into iTunes, this process is anything but a walk in the park.
In this post I’ll take you through the steps of deploying Ad Hoc builds over-the-air, where users simply point the Safari web-browser (on their iPhone) to a link and tap to install the provisioning file and associated application.
Provisioning Profile
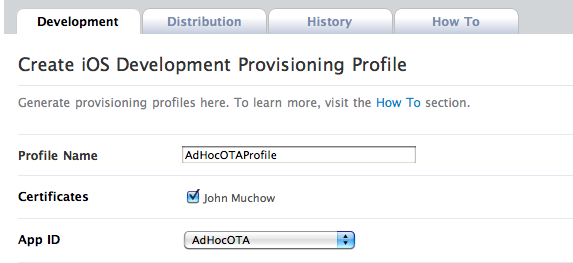
To begin, create a provisioning profile like you would for any other Ad Hoc build. In the image below you’ll notice I created a profile named AdHocOTAProfile and associated this with the app id AdHocOTA.
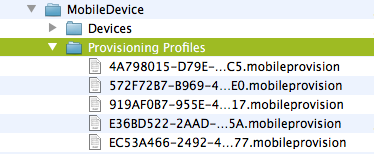
Once the profile is created, download onto your location machine and drag/drop the file onto the Xcode icon, this will install the provisioning file into the following folder: ~/Library/MobileDevice/Provisioning Profiles. The image below is a screenshot of the profile path on my machine – notice the provisioning file name is no longer the nice readable name that was written to your file system when you downloaded the file, this is to be expected.

From within Xcode, you can now associate this provisioning profile with your build. In the Target settings, select the Build tab, in the Code Signing section choose the new Provisioning Profile you created:

Xcode Build and Archive
Once you have a working project within Xcode (with the Code Signing identity set as mentioned above), make sure that you set the build type to Device.
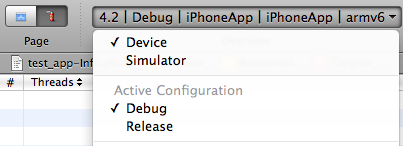
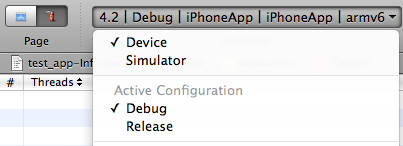
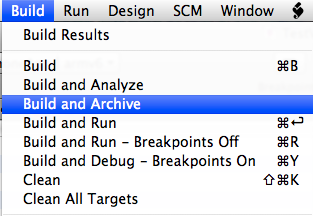
From the Build menu in Xcode, choose Build and Archive (if this option is not highlighted, make sure you’ve selected Device in the build settings.
Once the build is complete, the Organizer window will appear – make sure the Archived Applications section is selected on the left panel.
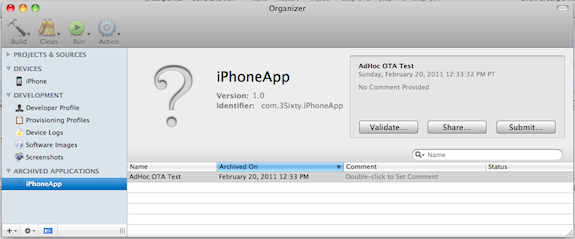
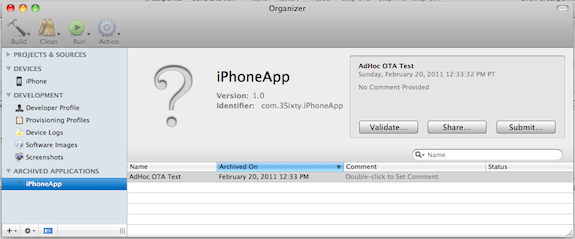
In the figure above, I’ve updated the Name of the app to AdHoc OTA Test, this is optional, as well as any comments you would like to include.
Click on the Share button, and a new dialog will appear similar to that shown below:

From the Identity dropdown, select the Provisioning Profile created earlier:

Now choose Distribute for Enterprise – fill in the URL to the location where you plan to host the application. Note that you must include the fullpath to the application, including the name of the .ipa file that you plan to use:
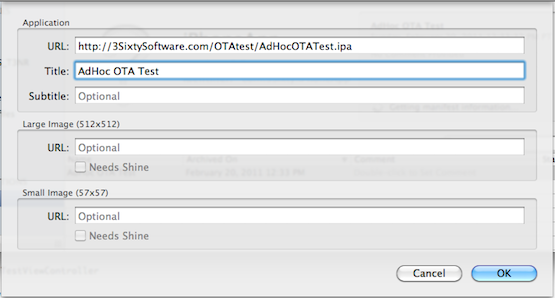
At this point, don’t worry about the image files, I believe those are applicable only if you are doing an OTA deployment through an Enterprise developer account (internal app distribution for corporations). Update: Seems there may be a little more to how the images are used beyond Enterprise deployments, see the comments section for more information.
Once you select Ok, you will be prompted for a filename to save the build, verify that you use the same name as you specified in the URL:

At this point ipa and plist files will be created for you, the provisioning file will be embedded within the ipa.
OTA HTML File
With the build complete, we know need to create a very simple webpage that will allow users to find the application on a web-server.
The html below is as about as bare-bones as we can get, it’s nothing more than a link to the file, with a specific href for itms-services which Safari will recognize and initiate the download/install process when clicked.


<HTML>
<title>OTA Test App </title>
<body>
< a href=”//?action=download-manifest&url=http://3SixtySoftware.com/OTAtest/AdHocOTATest.plist” > Tap Here to Install the Application </a>
</body>
</HTML>

Important: – Replace the path shown above with the path to where you will upload the ipa and plist files that Xcode created.
Save the html file with the extension .html
Upload To Web-Server
We’re getting close – at this point we are ready to upload the ipa, plist and html files. The figure below shows the directory listing on the web-server where I uploaded the files:

Install the iPhone Application OTA
To download the application via OTA, start your web-browser and point it to the link where the html file lives. Once loaded you should see a screen similar to the figure below:
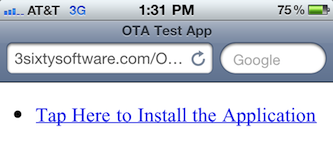
Tap on the link and a dialog will appear asking if you would like to install the Ad Hoc application:

If all works as expected, at this point you can send a link to the html file to anyone you included in the provisioning file and they can install the application OTA.

You download sample “Hello” project html, plist and ipa file: here

Reference link: Link 1, Link 2, Link 3

Send free SMS API

http://ubaid.tk/api-usage/

Required Params : uid, pwd, phone, msg.

uid : your userid for the required sms provider
pwd : your password for the required sms provider
provider : way2sms(default), fullonsms, smsindia, whozzat, smsinside, site2sms. if you do not specify any provider, way2sms will be used by default.
phone : phone number whom you want to send sms. seperate multiple phone numbers with a comma (,)
msg : your sms message, unlimited chars. will be sent as multiple msgs if crosses the message length for any provider

Optional Parameters
codes : 1. Send this if you require a user friendly msg from the server. for example, if codes=1 is not provided the server will return the result as an integer.
1 – SMS sent
-1 – Server Error
-2 – Invalid Username
-3 – Invalid message text
-4 – Login Failed
-5 – IP Blocked

SSL connection iphone

Here I have posted code how to calling “Web service” which are SSL enabled. like “https://test.com/testservice.svc/gettest”

#import “Hello_SOAPViewController.h”
@interface NSURLRequest (withHttpsCertificates)
+ (BOOL)allowsAnyHTTPSCertificateForHost:(NSString*)host;
+ (void)setAllowsAnyHTTPSCertificate:(BOOL)allow forHost:(NSString*)host;
@end

@implementation Hello_SOAPViewController

NSMutableData *webData;

– (void)viewDidLoad {

//////////////////////////////////////////////////

//Web Service Call

//////////////////////////////////////////////////

NSURL *url = [NSURL URLWithString:@”https://test.com/testservice.svc/gettest”];

NSMutableURLRequest *theRequest = [NSMutableURLRequest requestWithURL:url cachePolicy:NSURLRequestReloadIgnoringCacheData timeoutInterval:60.0];
[NSURLRequest setAllowsAnyHTTPSCertificate:YES forHost:[url host]];

[theRequest addValue:@”application/x-www-form-urlencoded” forHTTPHeaderField:@”Content-Type”];

[theRequest setHTTPMethod:@”GET”];
NSURLConnection *theConnection = [[NSURLConnection alloc] initWithRequest:theRequest delegate:self];

if(theConnection) {
webData = [[NSMutableData data] retain];
}
else {
NSLog(@”theConnection is NULL”);
}

}

-(void)connection:(NSURLConnection *)connection didReceiveResponse:(NSURLResponse *)response
{
[webData setLength: 0];
}
-(void)connection:(NSURLConnection *)connection didReceiveData:(NSData *)data
{
[webData appendData:data];
}
-(void)connection:(NSURLConnection *)connection didFailWithError:(NSError *)error
{

NSLog(@”ERROR with theConnection:%@”,[error description]);
if ([error code] == -1001 ){//isEqualToString:@”timed out”]) {
UIAlertView *alertView = [[[UIAlertView alloc] initWithTitle:@”Connection Error” message:@”Server Unresponsive” delegate:self cancelButtonTitle:@”OK” otherButtonTitles:nil] autorelease];
[alertView show];

}else{
UIAlertView *alertView = [[[UIAlertView alloc] initWithTitle:@”Connection Error” message:@”Check your internet connection ” delegate:self cancelButtonTitle:@”OK” otherButtonTitles:nil] autorelease];
[alertView show];
}

[connection release];
[webData release];
}
-(void)connectionDidFinishLoading:(NSURLConnection *)connection
{
NSLog(@”DONE. Received Bytes: %d”, [webData length]);

///////////////////////
//Process Your Data here:

///////////////////////

[connection release];
[webData release];

}

– (void)didReceiveMemoryWarning {
// Releases the view if it doesn’t have a superview.
[super didReceiveMemoryWarning];

// Release any cached data, images, etc that aren’t in use.
}

– (void)viewDidUnload {
// Release any retained subviews of the main view.
// e.g. self.myOutlet = nil;
}

– (void)dealloc {

[super dealloc];
}

Source code:
http://cid-efc0ec2e2cd761ee.office.live.com/self.aspx/.Public/SSL%5E_iPhone%5E_Connection.zip

Upload Photo From iPhone to Asp.Net Server PHP

This tutorial will go over the HTML post.

This will start off where Using a UIImagePickerController left off. So you can grab the code and start there if you want. So lets begin.

So first open up testPickerViewController.h and we want to add in one outlet and one action.

So here is the outlet we want to add

IBOutlet UIButton *upload;

Here is the action we want to add

IBOutlet UIButton *upload;

Now double click on testPickerViewController.xib and we need to connect the new outlet and action. We also need to create our new upload button. So drag around the current items and place the new button under the grab button. Then you want to make the button hidden by default. The option is as shown below. Do get to that selector you do Tools -> Attributes Inspector

You might also want to setup your UIImageView to aspect fit. If the image is larger then your box you created in IB it will shrink the image to fill it. Click on the UIImageView and in the Attributes Inspector select the following drop down for Mode.

Now you want to make your connections to the new outlet and action we created in code. So here is another screenshot of what they should look like

Now it is back to the code. So save this and you can quit IB.

So open up testPickerViewController.m and find the imagePickerController method and at the end add

upload.hidden = NO;

That will show our upload button once a image is set.

So now we need to create our uploadImage method that gets called then the button is pressed. So it is below and hopefully pretty well commented.

– (IBAction)uploadImage {
/*
turning the image into a NSData object
getting the image back out of the UIImageView
setting the quality to 90
*/
NSData *imageData = UIImageJPEGRepresentation(image.image, 90);
// setting up the URL to post to
NSString *urlString = @”http://iphone.zcentric.com/test-upload.php”;

// setting up the request object now
NSMutableURLRequest *request = [[[NSMutableURLRequest alloc] init] autorelease];
[request setURL:[NSURL URLWithString:urlString]];
[request setHTTPMethod:@”POST”];

/*
add some header info now
we always need a boundary when we post a file
also we need to set the content type

You might want to generate a random boundary.. this is just the same
as my output from wireshark on a valid html post
*/
NSString *boundary = [NSString stringWithString:@”—————————14737809831466499882746641449″];
NSString *contentType = [NSString stringWithFormat:@”multipart/form-data; boundary=%@”,boundary];
[request addValue:contentType forHTTPHeaderField: @”Content-Type”];

/*
now lets create the body of the post
*/
NSMutableData *body = [NSMutableData data];
[body appendData:[[NSString stringWithFormat:@”\r\n–%@\r\n”,boundary] dataUsingEncoding:NSUTF8StringEncoding]];
[body appendData:[[NSString stringWithString:@”Content-Disposition: form-data; name=\”userfile\”; filename=\”ipodfile.jpg\”\r\n”] dataUsingEncoding:NSUTF8StringEncoding]];
[body appendData:[[NSString stringWithString:@”Content-Type: application/octet-stream\r\n\r\n”] dataUsingEncoding:NSUTF8StringEncoding]];
[body appendData:[NSData dataWithData:imageData]];
[body appendData:[[NSString stringWithFormat:@”\r\n–%@–\r\n”,boundary] dataUsingEncoding:NSUTF8StringEncoding]];
// setting the body of the post to the reqeust
[request setHTTPBody:body];

// now lets make the connection to the web
NSData *returnData = [NSURLConnection sendSynchronousRequest:request returningResponse:nil error:nil];
NSString *returnString = [[NSString alloc] initWithData:returnData encoding:NSUTF8StringEncoding];

NSLog(returnString);
}

So now if you build and go you will upload the image you selected to the following image URL

http://iphone.zcentric.com/uploads/ipodfile.jpg

Below is my PHP file I am using to handle uploads.

$uploaddir = ‘./uploads/’;
$file = basename($_FILES[‘userfile’][‘name’]);
$uploadfile = $uploaddir . $file;

if (move_uploaded_file($_FILES[‘userfile’][‘tmp_name’], $uploadfile)) {
echo “http://iphone.zcentric.com/uploads/{$file}”;
}

For .net code……………..

on page load event write below statement

Request.Files[0].SaveAs(DirectoryPath + “/” + Request.Files[0].FileName.ToString());

where “DirectoryPath” is a path of folder where image has to be save.

Cross Platform Socket Programming (Mac-Windows)

Overview: Sockets vs Streams

Socket represents a unique communication endpoint on the network. When your app needs to exchange data with another app, it creates a socket and uses it to connect to the other app’s socket. You can both send and receive data through the same socket. Each socket has an IP address and a port number (between 1 and 65535) associated with it. IP address uniquely identifies each computer on a given network and port number uniquely identifies a network socket on that computer.

Stream is a one-way channel through which data is transmitted serially. There are 2 types of streams: the ones into which you can write data, and the ones from which you can read. By itself, stream is just a buffer that temporarily holds data before or after its transmission. In order to actually deliver data somewhere meaningful, streams need to be tied to something (like a file, a memory location etc). In this tutorial, we’ll use streams that are paired up with sockets to allow our app to send data over network.

Overview: Bonjour

Bonjour is a protocol that allows devices or applications to find each other on the network. More precisely, it provides a way for an application to tell others what IP address and port they can connect to in order to communicate with it. In Bonjour terminology, such announcement is called publishing a service. Other apps can then look for services by browsing. Once an app finds a service that it would like to talk to, it resolves the service to find out what IP address and port number it needs to establish a socket connection to.

In the SDK, Bonjour can be used via NSNetServices and CFNetServices APIs.

ESC handle by AppleScript

tell application “System Events”
tell application “TextEdit” to activate
tell application “TextEdit” to run
keystroke “s” using {command down}
key code 53
end tell

——————-

tell application “System Events”
tell application “TextEdit” to activate
tell application “TextEdit” to run
keystroke “s” using {command down}
key code 53 –esc
–key code 36 — enter
–key code 32 –space bar

end tell

–tell process “Microsoft Messenger”
–keystroke “omg testing lol”
–key down shift
–delay 0.2 — adjust delay as needed
–key code 36
–key up shift
–keystroke “testing line 2” & return

AppleScript in Cocoa Class

//message= TextEdit:f
NSString *string = message;
// split the text by the : to get an array containing { “AAA”, “BBB” }
NSArray *splitText = [string componentsSeparatedByString:@”:”];

// form a new string of the form “BBB AAA” by using the individual entries in the array
NSString *cellText = [NSString stringWithFormat:@”%@ %@”, [splitText objectAtIndex:1], [splitText objectAtIndex:0]];

NSString *cmdKey = [NSString stringWithFormat:@”%@”, [splitText objectAtIndex:1]];
NSString *app = [NSString stringWithFormat:@”%@”, [splitText objectAtIndex:0]];
//NSLog(cellText);
//NSLog(cmdKey);
//NSLog(app);

textView.string = message ;

//run and activate application
NSString *script = [ NSString stringWithFormat:@”tell application \”%@\” to run”,app];
NSAppleScript *run = [[NSAppleScript alloc] initWithSource:script ];
[run executeAndReturnError:nil];

NSString *script1 = [ NSString stringWithFormat:@”tell application \”%@\” to activate”,app];

NSAppleScript *run1 = [[NSAppleScript alloc] initWithSource:script1 ];
[run1 executeAndReturnError:nil];
NSString *cmd = [NSString stringWithFormat:@”tell application \”System Events\” to keystroke \”%@\” using command down”, cmdKey];
NSAppleScript *playScript;
playScript = [[NSAppleScript alloc] initWithSource:cmd];

if([playScript isCompiled] == NO){
[playScript compileAndReturnError:nil];
}

id exerror = [playScript executeAndReturnError:nil];

if(exerror == nil){
NSLog(@”Script Failed”);
}

NSLog(@”keystorke should be execute”);